
Neo development has moved on to Neutrino, which combines the power of Webpack with the simplicity of presets to more than just React projects. Check it out at https://neutrino.js.org.
The current landscape for building out modern front-end applications is complicated. Deciding to take the plunge into a React app can carry quite a bit of baggage depending on the features you expect during development. Being able to use JavaScript imports and modules from npm, the latest ECMAScript proposals, JSX syntax, CSS preprocessing, linting, testing, ad infinitum can leave you feeling overwhelmed when you just want to start hacking on your project. Nowadays using Webpack to manage these processes is recommended, but getting started with it can be time consuming as it requires a good amount of configuration and tweaking to get the settings correct to start writing code. Neo was created to ease that pain so you can quit worrying about configuring and get back to coding.
mozilla/neo
neo - Create and build React web applications with zero initial configuration and minimal fussgithub.com
Neo is an npm package that bakes in the best-of-the-bunch configurations and setup to make getting started writing a static single-page app simple and easy, but also allows you to change and customize it as your project evolves. It is not another React boilerplate; Neo gives you a single dependency to install in your project to start building and developing right away. At a high level, Neo wraps the functionality of Webpack with a set of pre-configured targets for development, testing, and production optimized to let you hit the ground running right after installation and initialization. At the present you get the following features with zero upfront maintenance:
- Initial project scaffold for new applications
- Abstracted building for development, testing, and production modes
- React, React Router, and Redux, with hot module reloading
- Babel compilation with ES2015 + imports, Stage 0 preset, and JSX
- Tests and coverage using Karma, Mocha, Chai, and Enzyme
- Immutable.js
- Bootstrap v4 alpha and Sass preprocessing
- Installable with Node.js v6, includes Travis testing configuration, and git hooks that run tests prior to committing
Getting Started
Installing Neo is a bit different based on whether you are starting a new project or want to integrate into an existing project. Let’s take a look at a fresh project.
Starting a new project
You’ll need Node.js v6 and npm to get started with Neo. Neo includes a command line tool to make starting a new project simple, and you can install it either globally or local to your project. If you want to install Neo globally, run the following from your shell and follow the prompts (replacing
npm install -g mozilla-neo
mkdir <project-name> && cd <project-name>
neo init
If you don’t wish to install Neo globally on your computer, you can also keep its setup local to your project with a couple changes to the previous command:
mkdir -p <project-name>/node_modules && cd <project-name>
npm install mozilla-neo
node_modules/.bin/neo init
Neo will ask you just a few questions about the project, then it will scaffold out all the initial files and dependencies it needs.
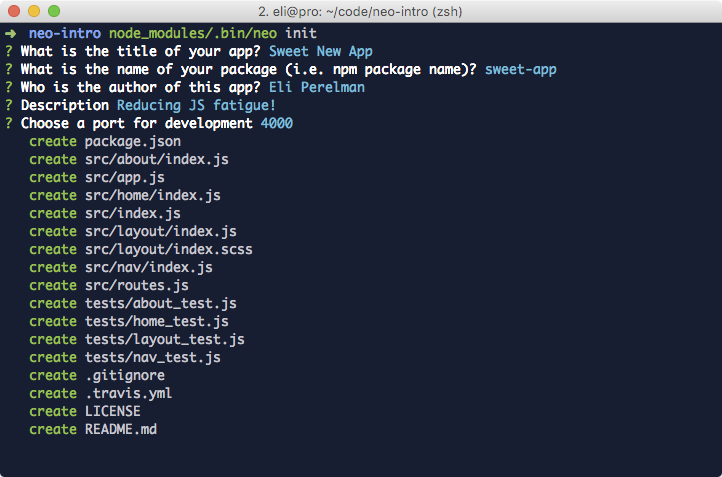
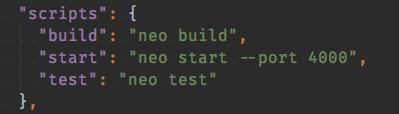
At this point you already have something that is buildable, testable, and deployable. Let’s inspect the package.json to see what’s available at the start. Looking at the “scripts” field, you’ll notice three targets: build, start, and test.
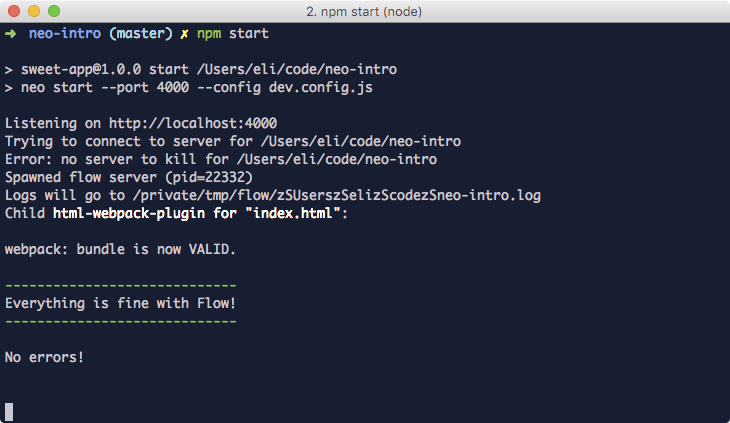
I’m going to start this app with `npm start` and see what is generated by default:
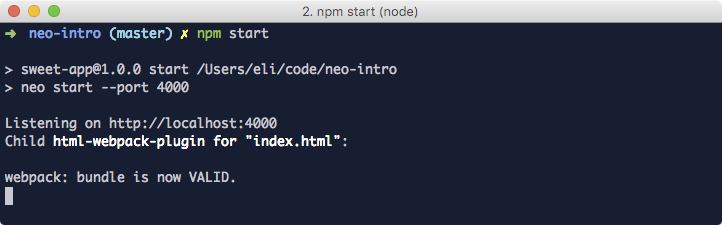
Nice, our app is running! Let’s open it.
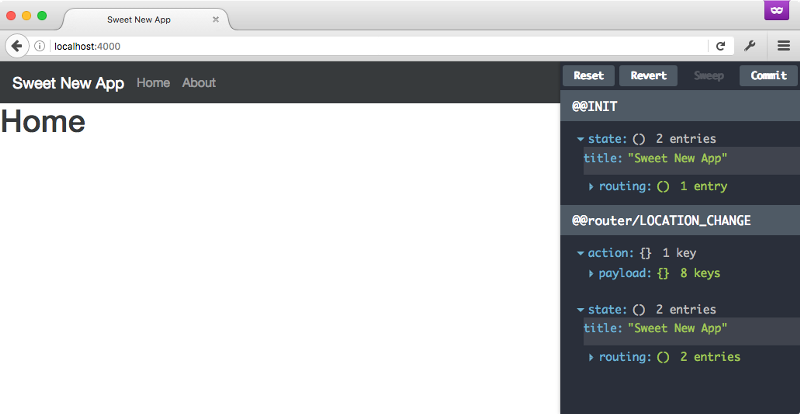
In just a couple steps, we have a fully-functioning app complete with an introductory Bootstrap layout, React-based views running with React Router, and Redux including Dev Tools. Not bad! You can run the “test” and “build” commands out of the box, too.
Getting Into Development
By default all files that are for your web app will live in the “src” directory and test files in the “tests” directory. Feel free to start writing code, modifying files, or ripping it apart to suit your preferences. Neo does its best to avoid locking you into a permanent opinion of the project. When you’re ready to deploy, run “npm run build” and Neo will create an optimized version of your app in a “build” directory which you can push anywhere you desire.
Extending Neo
Ask a thousand developers their preferences for writing a React app, and you’ll get a thousand different opinions. Neo understands this. While Neo does start off with an opinion of your project, you aren’t locked into it. Inevitably things change, and you want to add your own features or changes to the building process. Neo tries to make this as painless as possible. Let’s take a look at a couple scenarios to get an idea of what’s possible.
It’s important to note that Neo works out-of-the-box with no modifications, and you can run and build your projects with no configuration changes. You only need to configure Neo when you want to override or augment Neo’s behavior. This is totally optional!
ESLint: Disallowing Semicolons
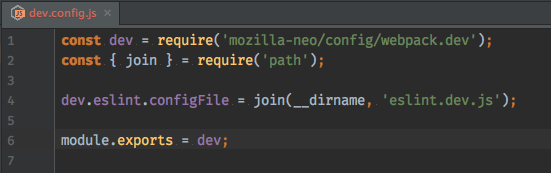
Let’s say you want to make a change to the ESLint rules of your project. For this example, I’m going to override the Neo defaults and disallow semicolons from this project while in development. Create a new JS file in the root of your project to hold these changes, I’m going to call mine “dev.config.js” but you can name it anything you wish.
Neo exposes all of its configuration and you can override these in your own files if you have the need. I’ll require Neo’s development config and change it to point to my own ESLint configuration:
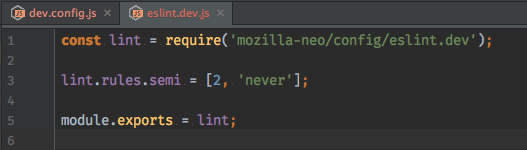
Now I can either provide a completely new ESLint configuration or simply modify Neo’s ESLint config. I’m going to create this new “eslint.dev.js” file in the root of the project and fill it with this, adding a single change:
Lastly, let’s tell Neo to use our new config during development. Open package.json and modify the “start” script:
"start": "neo start --port 4000 --config dev.config.js",
That’s it! Let’s see what happens when we start now:
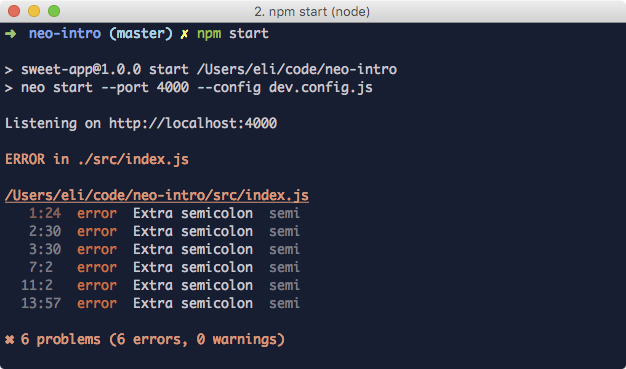
Errors! Our ESLint changes were simple to implement. You can choose to override or completely replace Neo’s ESLint rules by merely exporting your intent from your ESLint config file.
Adding Flow
Want Neo to check your Flow-annotated source during development? Let’s make a few changes to support that! First up, let’s install and setup Flow and a plugin to check the source:
npm install --save-dev flow-bin flow-status-webpack-plugin
node_modules/.bin/flow init
Next let’s modify the newly-created .flowconfig to ignore “node_modules” so we can focus on our own source:
[ignore]
.*/node_modules/.*

[include]

[libs]

[options]
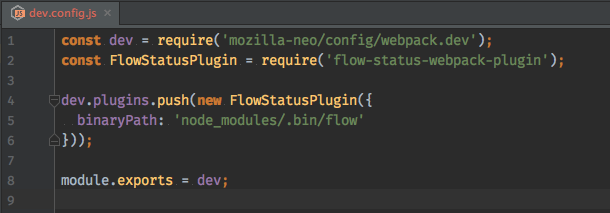
Now, to tell Neo to check our Flow-annotated source let’s create a “dev.config.js” file in the root of the project with the following code:
And specify this file to Neo when starting in package.json:
"start": "neo start --port 4000 --config dev.config.js",
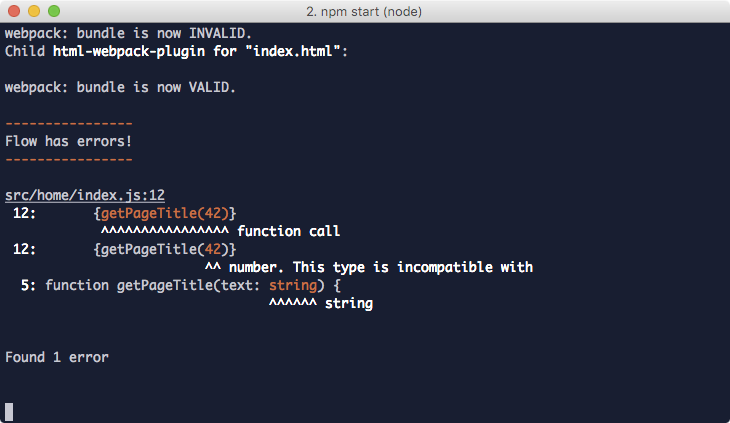
Let’s run it!
And if you violate your annotations:
Change the default HTML template
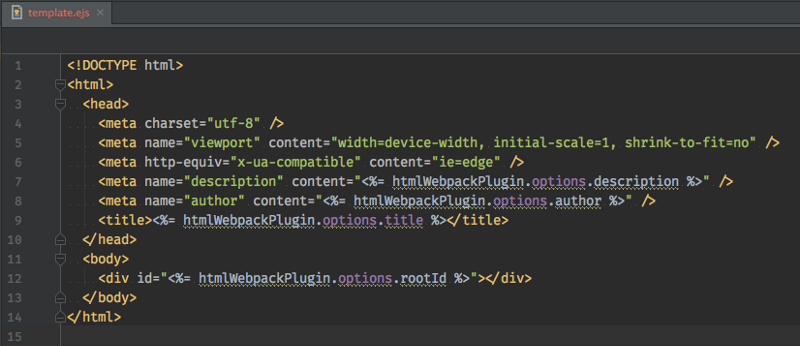
Neo uses a default EJS template file to generate the initial HTML for your app. Here’s what is the template file includes by default:
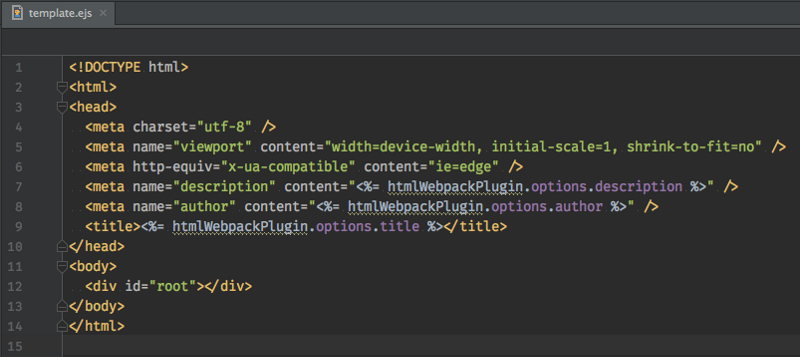
Overriding this default template is as easy as creating a new “template.ejs” file in your “src” directory and Neo will pick it up automatically, no configuration changes necessary. You may notice a few predefined template tags in the above source. These come from your package.json in the `config.html`, and can be changed or augmented as you desire. You may notice existing values there; these were created during the `neo init` step. Let’s open up the package.json and add an entry to the `config.html` section to support using configuration to specify our React mounting element:
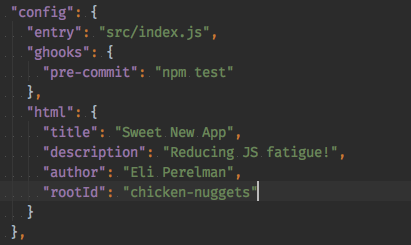
Next I’ll create a template.ejs file in the “src” directory of my project with the following content:
Now I’m free to use a dynamic React mounting point if I so desired:
import { render } from 'react-dom';
import App from './App';
import { config } from '../package.json';
render(<App />, document.getElementById(**config.html.rootId**));
Summary
Neo provides a great deal of functionality out of the box to help you get started creating and building React web applications with as little fuss and up-front configuration as possible. Get a quick start with a few commands, or enhance your build as your project grows and changes; it’s up to you!
Neo welcomes all contributors and issues. If there is something you believe should be changed or if you experience any problems, we welcome you to submit an issue or create a pull request. Enjoy!
mozilla/neo
neo - Create and build React web applications with zero initial configuration and minimal fussgithub.com